How to Ease Your Motion Sickness—No Medication Required

I

t’s summer. That means it’s time for road trips, sailing excursions, or flying off to vacation destinations. But all that getting away isn’t much fun if traveling makes you feel queasy. And statistics reveal that you are not alone: two-thirds of people experience motion sickness. There are remedies, but the currently available medications often induce drowsiness–meaning you might sleep through your joyful travel experience.

The good news is that there are natural, non-pharmaceutical ways to get relief–including yogic breathing.

Why Do You Feel Queasy?

Motion sickness occurs when there is a mismatch between sensory signals. For instance, when you’re in a moving vehicle, your inner ear tells you you’re moving, but if you’re looking at a book or smartphone, your eyes may perceive stillness. This sensory disconnect can disrupt the normal functioning of your vestibular system, which is responsible for maintaining your balance and equilibrium. This can lead to symptoms such as nausea, dizziness, and vomiting.

It’s not just travel that causes motion sickness. An upset stomach  can occur when you’re exposed to any kind of turbulent motion. Research suggests that some people get ill from airplane turbulence, amusement park rides, schussing down ski slopes or even camel riding. You can even experience motion sickness sitting still, such as when you’re playing video games or wearing a virtual-reality headset.

Some people rarely experience motion sickness. Your susceptibility may vary based on factors like genetics, previous experiences, and individual physiology. However, if you are one of the few who could experience seasickness on dry land (raising my own hand here) motion sickness medication helps reduce signals of nausea and vomiting by blocking the relevant neurotransmitters in your brain.

Breathwork Works

A 2015 study published in The Journal of Physiology found that people who experience motion sickness may have an increased sympathetic response (fight or flight) and reduced parasympathetic activity (rest and digest) when they get sick. This research suggests that balancing your sympathetic and parasympathetic branches, as well as hormonal and cortical patterns, may be the key to alleviating some symptoms.

“Breathwork has the power to bring about a sense of inner calm,” according to Linda Stern Lang, a clinical instructor at the George Washington University Center for Integrative Medicine. It can induce physiological changes that relax your gut and shift your biochemistry, alleviating the stressors responsible for nausea. For motion sickness relief, Lang suggests practicing diaphragmatic breathing and alternative nostril breathing. In both cases, breathe slowly and keep your head still.

Why You Should Take a Yoga Retreat That Scares the Heck Out of You

If you think of yoga retreats as a way to escape the stresses of everyday life, you’re not alone. They can be a chance to unwind and let go of our worries. While there is certainly value in taking time to relax and recharge, a retreat can also be an opportunity to shake yourself up a bit. When you push yourself beyond your perceived limitations and face your fears head on, you may come away from the experience feeling exhilarated and energized. In fact, some of your most profound personal growth can emerge from doing things that unnerve you.

The original article was published on YogaJournal. Read it here.

Can Breathwork Help You Avoid Altitude Sickness?

For those of us with adventurous spirits, few experiences can match the exhilaration of ascending majestic mountains and basking in awe-inspiring views. But pursuing this breathtaking beauty may come with the hidden peril of altitude sickness, a condition triggered when your body struggles to adapt as oxygen levels diminish the higher you go.

As a dedicated yoga practitioner, I’ve often turned to my physical practice to prepare for and support hiking expeditions and to recover afterward. But when considering effective strategies for acclimatizing to high altitudes, a compelling question arose: Can breathwork aid in preparing for high-altitude challenges?

Read the full article on Outside.

The Most Relaxing Yoga Retreat Ever. (And It’s In Your Own Backyard.)

The original article was posted on YogaJournal. Read the article here.

As a physician working in a hospital, I’m generally on the schedule for seven days straight, then have seven days off. On my “hospital week,” I work 12- to 14-hour days, facing constant demands and high-stakes decisions. When I get home, I have just enough energy left to stare at the wall. And although a week off sounds like a luxury, those days are filled with catching up on errands, working on projects, and other acts of “adulting.”

I love what I do, but working long shifts for consecutive days can leave me feeling exhausted, stressed, and drained. And that can lead to decision fatigue, which can make even the smallest choices a struggle.

I was concerned about burnout and I realized something had to change—namely, how I took care of myself. Recognizing the need to take time to recharge, but not knowing specifically how to fill my cup, I turned to what I know best—yoga. I had read some recent research about a resilience-building yoga retreat for professionals that improved their sense of mindfulness, resilience, empowerment, and self-compassion. I needed a retreat.

Though I host yoga retreats twice a year, I don’t often make time to attend as a guest. I searched for a getaway that would fit my schedule and budget, but I came up short, so I decided to create my own personal yoga retreat at home. I’ve dubbed this my “stay-treat” and I’ve found it so rejuvenating that now they are a regular practice.

Finding the Time

It’s challenging to carve out a significant chunk of time solely for myself. The nagging voice of self-doubt occasionally creeps in, questioning my right to take a break when my to-do list seems never-ending. But by investing in myself in this way, I am able to show up more fully in all aspects of my life.

I block off an entire day for my stay-at-home sessions. I find that mapping out my day in advance and adhering to the structured schedule—just as you would at a yoga retreat—enables me to avoid overthinking the process and instead focus entirely on my breath, movement, and connection to my heart. By doing so, I am able to quiet my mind and recharge my mental batteries, allowing me to return to work with renewed focus and energy.

I’ve started booking a stay-treat day on my calendar whenever my schedule permits, and the results have been nothing short of transformative. I finish my personal retreat days with a renewed sense of vigor and clarity. Not only do I feel more centered and present for both myself and my patients, but I also find myself writing with greater creative fervor.

The most important thing about my stay-treats is that they have changed my relationship with yoga. My practice is no longer about trying to get something out of the experience, such as a workout, a stretch, or relaxation. Yoga became about cultivating a deeper relationship with myself; getting to know who I am and meeting her with clarity, generosity and open-heartedness.

Recipe for Your Personal Yoga Retreat

I encourage you to try creating your own solo yoga retreat at home. It can be a great way to focus on your practice, recharge your energy, and take time for yourself. Below is a sample schedule from one of my stay-treat days that you can follow, with links to practices that you might include. Of course you can revise it to fit your own needs. May it bring you peace and joy.

7:00 am: Wake up, drink warm water with lemon, and practice pranayama (breathing exercises)

7:30 am: Meditation

8:00 am: Yoga practice with gentle stretching, Sun Salutations, and standing poses

9:00 am: Enjoy a light breakfast, such as a smoothie, fresh fruit, or a bowl of oatmeal

10:00 am: Spend some time in silent meditation or journaling

11:00 am: Take a break and enjoy a healthy snack

11:30 am: Practice yoga, focusing on balance poses and twists

12:30 pm: Spend time in silence, maybe practice pranayama, self-massage, or dry-brushing.

1:00 pm: Have a nourishing lunch with a balanced mix of proteins, complex carbs, and healthy fats

2:00 pm: Take a nap or read a book

4:00 pm: Practice some gentle yoga poses to release tension and stress

5:30 pm: Take a walk outside, breathe fresh air and connect with nature

6:30 pm: Enjoy a light dinner such as soup, salad, or steamed veggies

7:30 pm: Spend some time in deep relaxation with Yoga Nidra or guided meditation

8:30 pm: Wind down with a warm bath or shower before bed

Remember, this is just a sample schedule and can be adapted to fit your personal needs and preferences. Enjoy your stay-at-home yoga retreat!

The Surprising Cause of Your Neck Pain

Original article posted on yogajournal.com. Read the original article here.

Many of us spend the majority of our time hunched over computer screens, scrolling through social media, or slouching on the couch binge-watching our favorite shows. This sedentary lifestyle, combined with historically high levels of stress, can lead to a host of physical discomforts, including increased muscular tension in the chest and neck. But did you know that neck pain and tight chest muscles may be closely linked?

Tight chest muscles can pull the shoulders forward, leading to a slouched posture, rounded shoulders, and an increased curvature of the upper spine (thoracic kyphosis). This can cause the neck to pull forward creating a forward head posture. Because your head is relatively heavy, this can strain your neck muscles, leading to pain and tension.

Anatomy and Kinesiology

You might be surprised at how many muscles play a role helping to hold your head and shoulders in a balanced position and maintain proper posture. The chest muscles (pectoralis major and minor) and the the upper back muscles (trapezius, rhomboids, latissimus dorsi, and serratus anterior) connect to the shoulder girdle, which includes the clavicle, scapula, and humerus bones.

The neck muscles—the levator scapulae, sternocleidomastoid, and scalenes—also attach to the shoulder girdle and provide support for the head and neck. The neck and chest muscles are interconnected in attachments to the sternum and ribs, and they play a crucial role in holding the head and shoulders in a balanced position and maintaining proper posture.

According to a study published in the Journal of Physical Therapy Science, forward head posture is associated with neck pain. But people who experience this forward tilt also had decreased activity in the muscles involved in breathing and experienced reduced chest expansion.

Another article found that shortened pectoralis minor muscles can alter the position of your shoulder blades. This, in turn, can affect neck posture and contribute to neck pain. The research suggests that less flexibility in your chest muscles may change your scapular and shoulder mechanics, increasing stress on the neck muscles and contributing to pain in your neck.

8 Yoga Poses to Stretch Your Chest

You can address muscular imbalances in the chest through targeted stretching and strengthening exercises. That’s where yoga can play a role in helping you stretch your chest muscles, increase thoracic mobility, and improve range of motion in the shoulder girdle and neck.

1. Sphinx Pose

Tight chest muscles may cause other compensatory muscular imbalances that lead to poor scapular (shoulder blade) control, which often contributes to neck pain. Sphinx Pose is a good place to start unraveling this tension, because it is a gentle chest expander and helps teach your body how to activate the upper back muscles that help to stabilize your shoulder blades.

Start by lying prone with your hands beneath your shoulders, palms down. Slide your hands forward until your forearms are parallel and your elbows are underneath or slightly in front of your shoulders. Raise your chest by pressing into your forearms. Spread your fingers wide  and isometrically draw your elbows toward your ribs as you engage your belly. Broaden across your collar bones. If you tend to tilt your head forward, drop your chin to find more  length along the back of your neck .Experiment with relaxing your chin down to lengthen the tightened muscles in the back of your neck. Press your shoulder blades downward to make more space between your shoulders and ears. Stay here for 3-5 breaths.

2. Salabhasana (Locust Pose)

“Upper trapezius dominance” is another compensatory muscular pattern for tight chest muscles.  When the upper trap muscles take over, they can cause the shoulders to elevate which shortens the neck muscles, leading to neck pain and discomfort. To counter this, it can be helpful to practice poses that strengthen the latissimus dorsi.

Start by lying prone with your forehead on the mat and your arms extended alongside your body. On an inhalation, lift your head, upper back and chest away from the mat. Clasp your hands behind you or hold a strap in both hands. Press your knuckles toward the wall behind you and feel your shoulder blades draw slightly together and down toward your hips. Lift your feet off the mat. Lift your chin slightly, keeping some length along the back of your neck. Unclench your jaw and gaze forward.  Stay here for 2-3 breaths and then relax back down. Repeat up to 5 times.

3. Supine Chest Opener

Tightness in the pectoralis muscles leads to rounded shoulders and causes the head to jut forward, resulting in neck pain and poor posture. This chest opener can be tailored to each person’s degree of muscle tension.

From a prone position, forehead on the mat, extend your left arm straight out to the side with your palm facing down. Bend your right knee and raise your right foot toward the ceiling. Place your right hand next to your chest and press into it, slowly rolling onto the left side of your chest as you step your right foot behind your left knee.. Keep your left shoulder on the mat and, to deepen the stretch of your left pecs, pressing a little more firmly into your right hand. Stay here for 3-5 breath cycles and repeat on the other side.

4. Thread-the-Needle Pose

Lack of mobility in the thoracic spine—the middle of your back from the bottom of your neck to the bottom of your ribcage—can cause compensation in your neck, resulting in your neck jutting forward. Thread-the-Needle Pose is a nice way to free up the cervical and thoracic spine while stretching some of the upper back muscles that can contribute to poor posture. Although this pose is not a chest opener per se, it enables mobility in the shoulder blades and upper back.

Come onto your hands and knees with your hips over your knees and your shoulders over your wrists. Thread your left arm across your chest and under your right arm, palm facing up. When you reach a comfortable stretch in your left shoulder, lower the side of your head and your left shoulder to the floor. Stay here for several breaths, then switch sides.

5.  Pascim Namaskarasana (Reverse Prayer Pose)

Reverse Prayer brings your shoulders into internal rotation while expanding your chest. If your palms do not meet, other options include touching your knuckles or holding onto a strap.

Kneel and sit back on your heels (or stand or lunge) with your arms down by your sides. Turn your palms to face behind you with thumbs alongside your hips. Bend your elbows and bring  your hands close together behind you. If your palms don’t comfortably meet, make fists and bring your knuckles toward each other or hold a strap taut between your hands. Stay here for 3-5 breaths and then slowly release your hands and shake out your arms.

6. Ustrasana (Camel Pose)

Camel is an intense chest opener and backbend. This variation of the pose keeps your hands on your back, so you can focus on the chest opener, not the backbend. It’s still an intense chest opener

Come to a kneeling position. (You may want to place a folded blanket under your knees for more comfort.) Bring your palms to your sacrum with the heels of your hands at the top of your buttocks and your fingers pointing upward. If your wrists are tight, you may prefer to make a fist and place your knuckles just above your buttocks. Inhale and draw your shoulder blades and elbows slightly toward each other while pressing your pelvis forward. Feel your sternum rise and tilt your chin upward while keeping length along the sides of your neck. As you breathe into the pose, envision maintaining length in your lower back and expansion in your chest. Stay here for 3-5 breaths and release the pose.

7. Purvottanasana (Reverse or Upward Plank Pose)

Reverse Plank is a core-strengthening pose that also creates stability and openness in the front of your shoulders and chest. Press your toes toward the ground, but it’s fine if they don’t get there.

Sit with your legs extended straight in front of you. Place your hands beside your hips with your fingers pointed toward the front of the mat. Press through your palms to  straighten your elbows, and  lift your hips. Gaze upward while maintaining length along the back of your neck. As you breathe, feel the front of your shoulders open. Stay here for 3-5 breaths and then lower your hips to the mat. Repeat up to 5 times.

8. Prasarita Padottanasana C (Wide-Legged Forward Bend), variation

This variation of Prasarita Padottanasana with the fingers interlaced behind your back, opens your chest toward the sky for an extra-juicy pectoralis stretch. The full expression of the pose includes a forward bend, which you might try, but to keep the focus on opening the shoulders  remain upright.

Step your feet about 3 feet apart into a wide-legged stance. Interlace your fingers or hold onto a strap, towel, or belt behind your back. Lift your heart toward the sky, gently gazing up without overextending your neck. If holding on to a strap, inch your hands closer together as you continue to open the front of your heart. Stay here for 5 breaths.


Should You Add Yoga to Your HIIT Workout?

Article originally posted on Outside.com. Read the original article here.

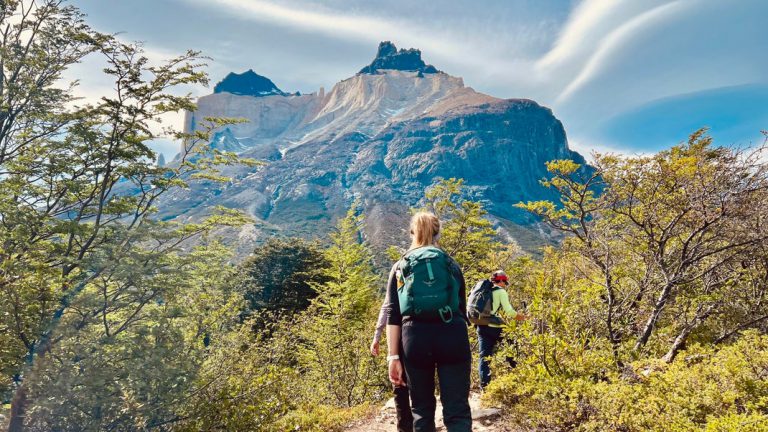
You’re busy. Between long hours at work, family demands, and social obligations, it can be difficult to squeeze a workout in. That may be why high-intensity interval training (HIIT), has become the go-to for those seeking a quick— and effective—workout. HIIT incorporates short bursts of high-intensity exercise followed by periods of rest or low activity.

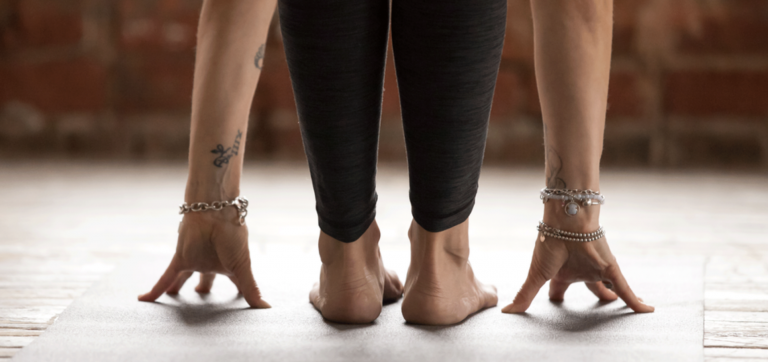
The Benefits of Adding Yoga to Your HIIT Routine

HIIT is designed to “get you moving near max effort in a short period of time, working your muscles until fatigue,” explains Tyler Millican, a fitness coach at San Diego-based HIIT studio Renegade Fit. To reap its full benefits, Millican advises you to make sure your body is able to keep up with HIIT’s demands, which requires steadiness and mobility.

That’s what yoga is about: mastering control of your body through different movement patterns, which is why it pairs so greatly with HIIT, says Millican. Experts have found that incorporating yoga into your HIIT workouts can not only help you stay limber but also boost your athletic performance.

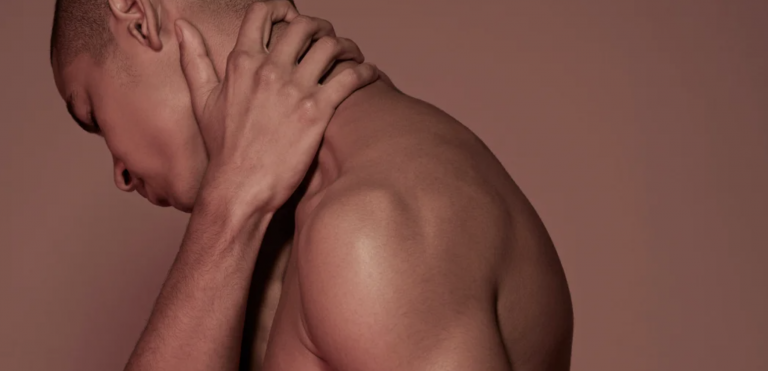
Yoga can also help increase flexibility, improve balance, and reduce the risk of injury, says Ajay Chapa, MD, a board-certified radiologist who specializes in musculoskeletal imaging. “One of the most common injuries I see resulting from HIIT workouts is overuse injuries, such as

tendonitis and stress fractures,” Chapa says. He recommends incorporating yoga into a HIIT routine to provide balance and restore the body’s natural range of motion, which can ultimately reduce the risk of these types of injuries.

Nicole Turnbow, a doctor of physical therapy and managing director at Body in Motion, agrees. In fact, Turnbow thinks that adding yoga to your HIIT workout is non-negotiable. “If time allows, you should be incorporating yoga before and after your HIIT workout; think of yoga as a warm up and cool down.”

Plus, yoga has been shown to reduce stress and anxiety, promote mindfulness, and enhance overall well-being. Turnbow recommends yoga after your workout because of the beneficial parasympathetic activation.

Are there any risks to adding yoga to a HIIT regimen? Turnbow says no. “The only risk is not incorporating enough yoga pre and post workout,” she says.

With a little help from our experts, we took their favorite HIIT-complimentary yoga poses and shared them in this yoga sequence. When incorporating yoga into your workouts, be sure to move with intention and an awareness of your breath. Remember, practicing yoga before or after your workout is preferred, but if you have to choose, practice these poses after your workout.

A Yoga Sequence for Your HIIT Workout

1. Revolved Side Lunge (i.e. “The World’s Greatest Stretch”)

Did you know that this beloved stretch is actually a variation of the yoga pose called Revolved Lunge? This pose targets all the major muscle groups and rotates your torso to free up the thoracic spine while stretching your left hip flexors and quadriceps. It can be used as a warm-up exercise before, or as a recovery exercise after, your workout. It is a great tension release for your hips and lower back.

From standing, step your left foot forward and bend your front knee, coming into a low lunge. If possible, keep your back knee off the ground and straight. Fold forward and place your right hand on the ground or a block beneath your shoulder. Reach your left arm upward and rotate your torso toward your left knee. You can also place your right elbow to the outside of your left thigh and press your palms together in front of your heart. Stay here for 3-5 breaths and switch sides.
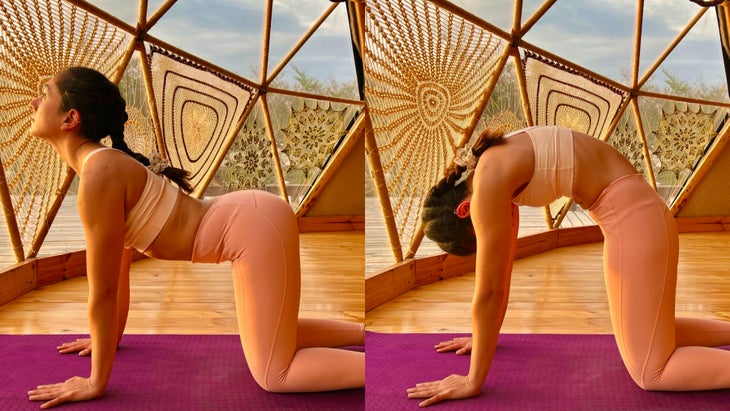
2. Cat-Cow

This stretch is one of Turnbow’s favorite ways to warm up your mid-back, especially if it’s an area of tightness. The Cat-Cow stretch involves moving your spine through flexion and extension to stretch and release tension in the erector spinae muscles, which run along your spine, as well as your deep core muscles, such as the transversus abdominis.

Start in a Tabletop position and alternate between arching your back to lower your belly (Cow Pose) on an inhalation and rounding your spine (Cat Pose) on your exhalation in a rhythmic movement.

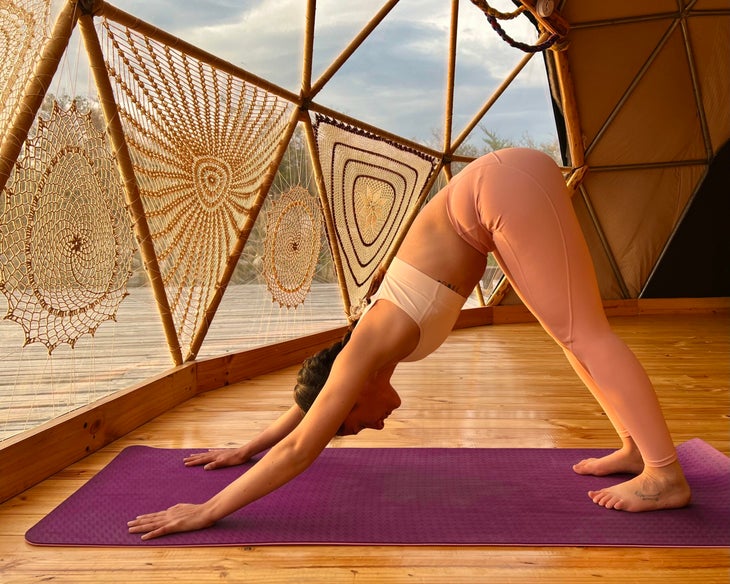
3. Downward-Facing Dog

This pose stretches your hamstrings, calves, and spine, and can help improve overall flexibility. By stretching the calves before a HIIT class, you can help ensure that your muscles are prepared for the physical demands of the exercise and help reduce the risk of injury. Practicing Downward-Facing Dog at the end of a workout can loosen up your hard-working legs and help them recover more quickly.

From Tabletop, tuck your toes and lift your hips up and back, straightening your arms and legs to form an inverted “V” shape. Press your hands and feet firmly into the ground and lengthen through your spine to deepen the stretch. Elongate the sides of your torso as much as possible to increase the stretch in your shoulder and hip joints. Stay here for 5 breaths. Repeat up to 3 times.
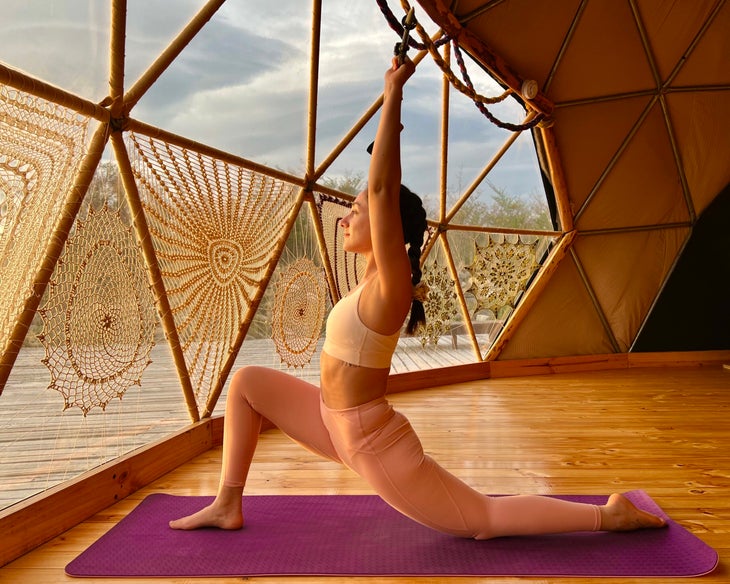
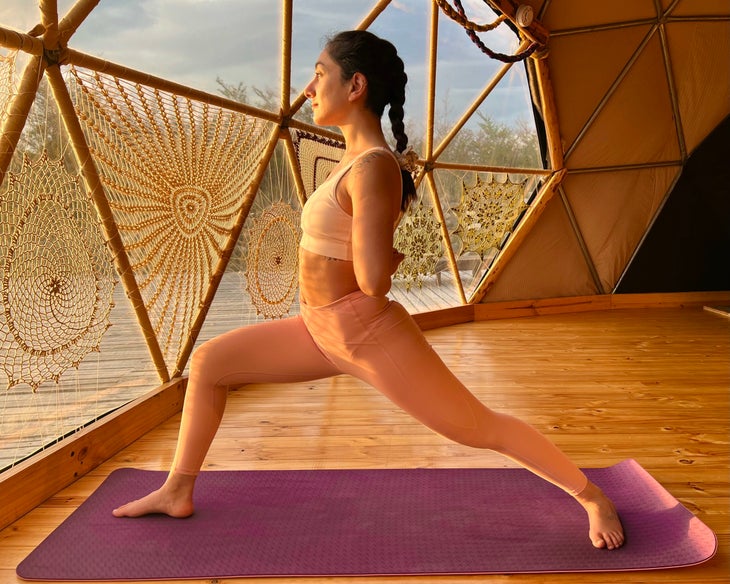
4. High Lunge

High Lunge is one of Millican’s go-to yoga poses. It helps strengthen your smaller joint-stabilizing muscles that are usually overlooked, even in well-programmed HIIT routines. “These muscles stabilize your joints in the optimal position and set the foundation when working up intensity in your HIIT,” Millican says.

From Downward-Facing Dog, step your right foot between your hands and align your knee above your ankle. Lift your torso and reach your hands toward the sky as you drop your hips slightly. This pose offers a nice stretch for your back (left) leg. You may notice your front ankle shifting back and forth to help you maintain balance, increasing strength and stability in your ankle joint.  Stay here for 3-5 breaths. Lower your hands back to the floor and transition through Downward-Facing Dog to repeat on the other side.

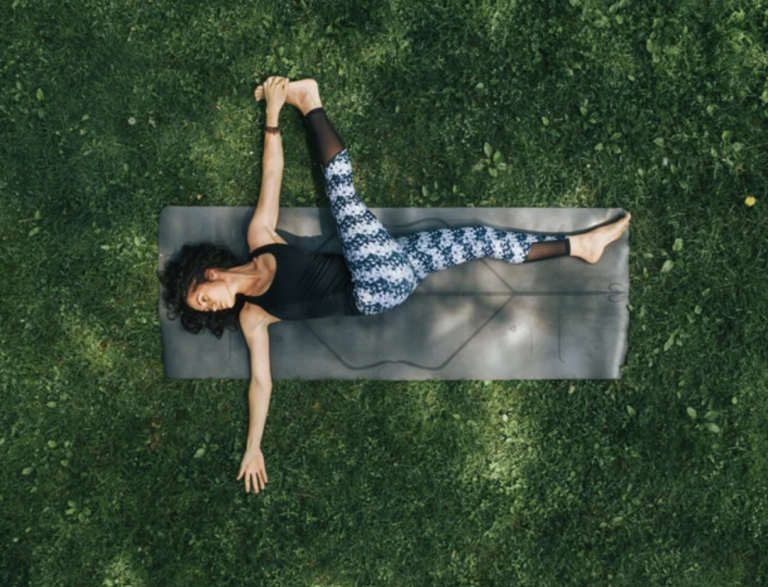
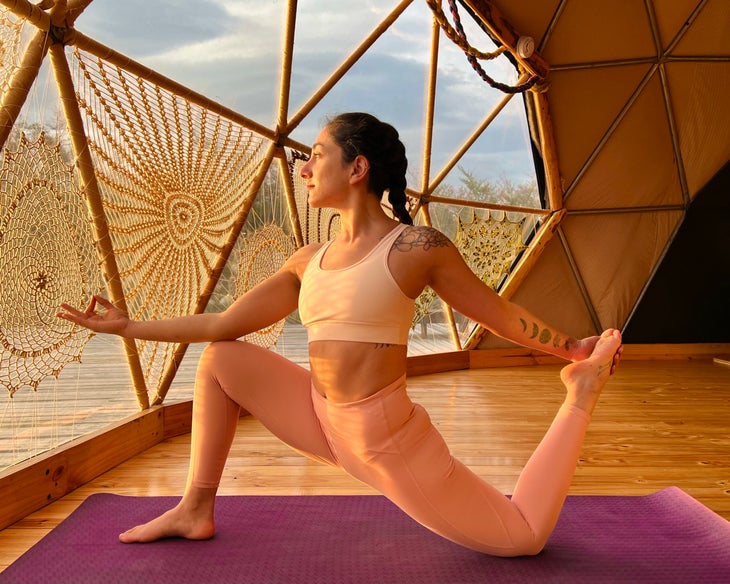
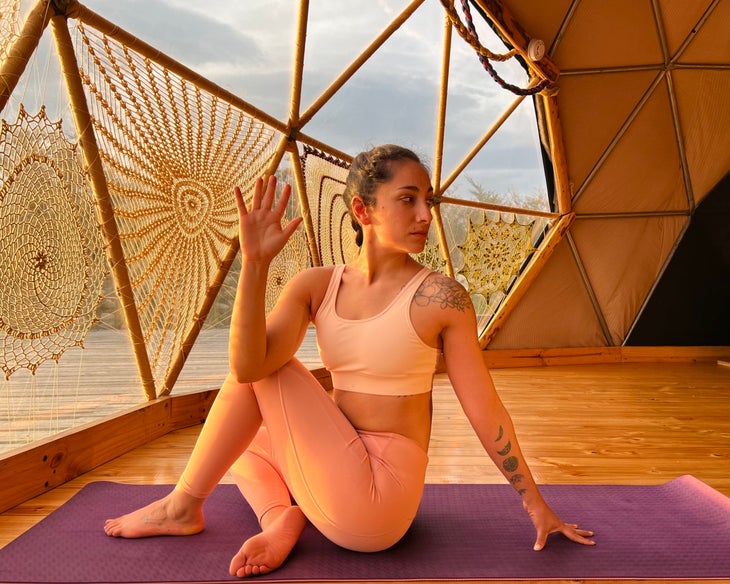
5. Skandasana (Side Lunge)

Skandasana is one of those well-loved but underrated yoga poses. Turnbow recommends adding it to your practice as it improves hip mobility, which is often restricted in people who do a lot of high-impact exercises. Additionally, Skandasana can help stretch and strengthen the muscles of your inner thigh and hip, which are often underutilized in HIIT workouts. If you have especially tight hips, practice a variation of this intense pose.

From a low squat position, center your body weight over your right foot and extend your left leg laterally to your side. You can keep your foot flat on the mat or rotate your left knee and foot upward and anchor into your left heel. Place your hands in a prayer position at your heart, or on the ground for balancing support. Optionally, place blocks under your hands for additional balance support. Stay here for several breaths before repeating on the other side.
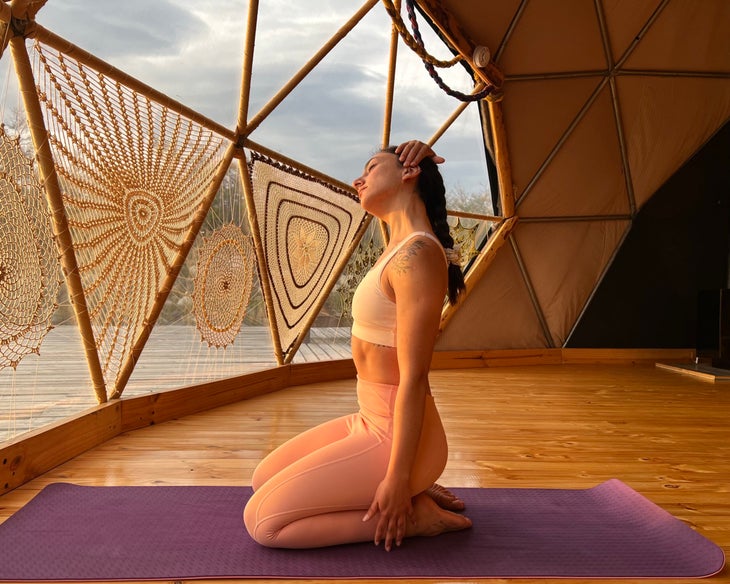
6. Cobra Pose

Millican also recommends Cobra Pose for its focus on posture, breath, and as a way to overcome fatigue. This pose helps strengthen your spine and open up your chest, shoulders, and abdominal muscles. It also stretches the tops of your feet, ankles and shins.

Start lying on your belly with your hands next to your chest and your feet hip-distance apart. Press into your hands and start to straighten your arms, lifting your chest into Cobra Pose. Roll your shoulders back and lift your sternum as you extend the crown of your head toward the sky. Engage your quadriceps and press strongly into the tops of your feet. Stay here for 3 breaths then lower gently. Repeat up to 5 times.
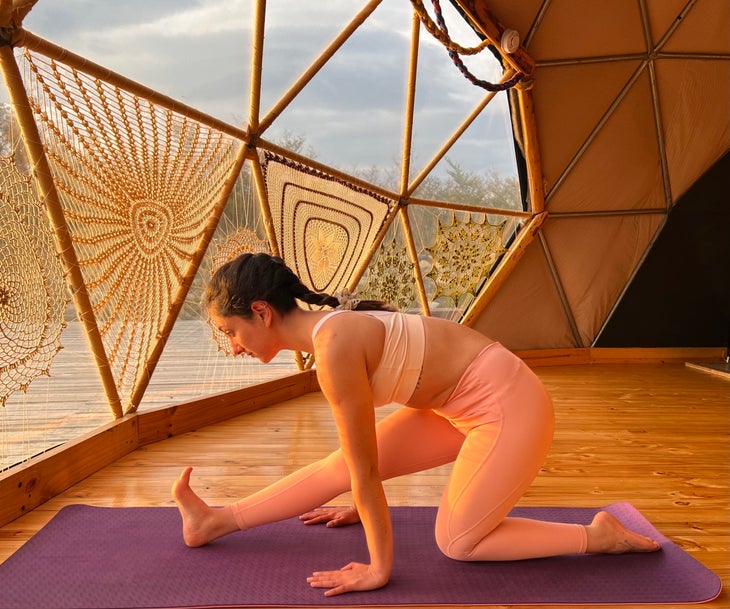
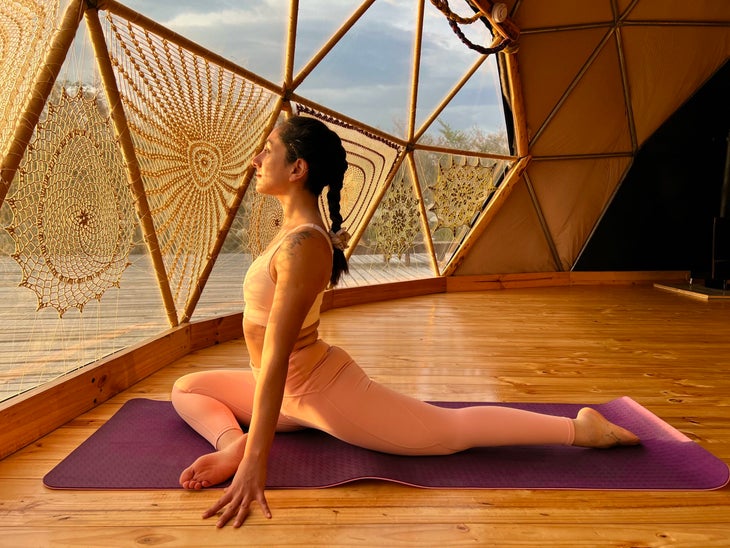
7. Pigeon Pose

Turnbow recommends Pigeon Pose, especially after your workout, to alleviate tension in your hips and lower back, which are common areas of tightness following HIIT workouts.

Start in a plank position, then bend your right knee and move it forward behind your right wrist. Rotate your right knee outward and bring your right ankle toward your left wrist. Extend your left leg straight behind you with the top of your foot on the ground. Keep your hips level. Remain upright or lower down onto your forearms and breathe deeply. Stay here for 5 breaths, then repeat on the other side.
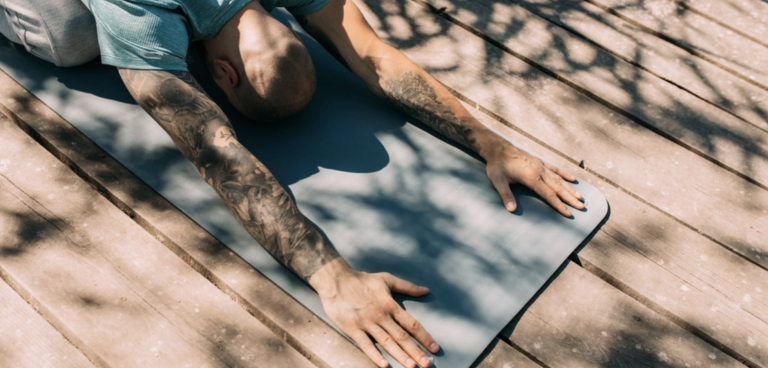
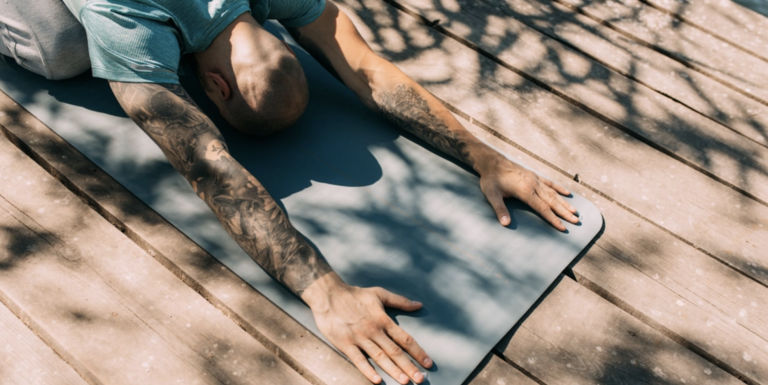
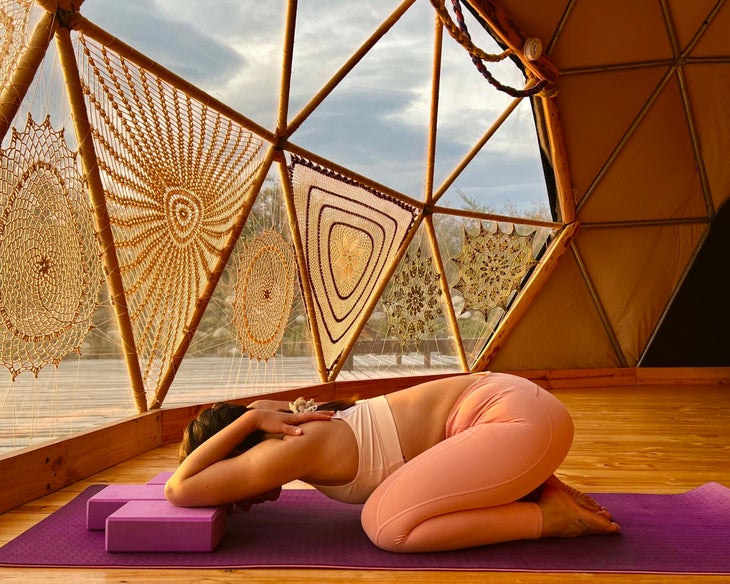
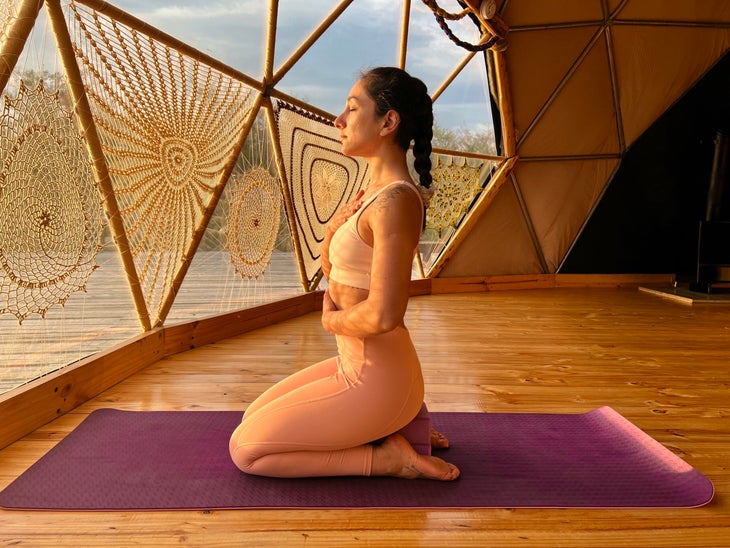
8. Child’s Pose

“I’m a big fan of Child’s Pose,” says Chapa. The quieting pose stretches your hips, thighs, and ankles as well as your spine, shoulders, and neck.

From a kneeling position, bring your big toes together to touch and widen your knees as far as is comfortable. Lower your hips toward your heels. Rest your arms alongside your body or reach them out as far as is comfortable in front of you. Rest your forehead on the ground or a folded towel and relax into the pose, taking slow, deep breaths. Soften your neck, shoulders, and hips and stay here for several breaths, or as long as feels comfortable.

12 Stretches for Hiking That You (Desperately) Need After a Day on the Trail

This article was originally published on Yoga Journal. View it here.

When you hike mountains, every day is leg day. While trekking in Patagonia, I sometimes wondered if my legs would ever not feel sore again. Hiking uses your gluteal muscles, quadriceps, hamstrings and calves, and requires sturdiness of all the joints—ankles, feet, hips, and knees. Carrying a pack can create tension in your neck and using hiking poles can cause your arms to become sore.

As it turns out, targeted stretching before and after each hike can prevent injury and aid in recovery. A recent survey of studies published in Wilderness Environmental Medicine Journal showed that yoga and stretching were associated with less injury for hikers.

After each day of 15-mile hikes in Patagonia, I returned to EcoCamp and practiced yoga in the Yoga Dome. Daily yoga gave my body the opportunity to recover with more ease and grace, rehydrating my muscles and freeing the lactic acid build-up. The following day’s hikes were met with less resistance in my joints and more intention in each step. So try this sequence after (or before, or preferably both!) your next hike. You’ll be impressed at how much faster you will recover from those long miles of uphill climbs.

Woman with dark braid practices yoga--Balasana (Child’s Pose with bent forearms)-- in a YogaDome, a geodesic dome in Patagonia. She is wearing peach colored tights and a light colored sports bra, and practices on a magenta colored mat. The room has wood floors and you can see crocheted covers on the triangular shaped windows. A view of the sky can be seen through the windows.

Balasana (Child’s Pose) with bent forearms

After miles on the trails, your entire body can feel tense and achy. Starting your post-hike practice in Child’s Pose invites relaxation into your nervous system and musculature. You can also open up your chest by propping your elbows and forehead on blocks, bending your elbows, and placing your fingertips on your shoulders. This also adds a stretch for the triceps, which can become sore from using hiking poles.

Woman with dark braid practices Adho Mukha Svanasana (Downward-Facing Dog Pose) in a YogaDome, a geodesic dome in Patagonia. She is wearing peach colored tights and a light colored sports bra, and practices on a magenta colored mat. The room has wood floors and you can see crocheted covers on the triangular shaped windows. A view of the sky can be seen through the windows.

Adho Mukha Svanasana (Downward-Facing Dog Pose)

After a day of hiking, especially if you have been carrying a big pack, some spinal decompression can be greatly appreciated, and this can be accomplished by any kind of inversion, including Downward-Facing Dog. It’s a fairly accessible inversion that provides gravity-driven lengthening for your spine. It also stretches your wrists and calves. If your calves feel particularly sore from going up and down the mountain, roll a blanket and place it under your heels for some extra support.

Woman with dark braid practices Vajrasana (Thunderbolt Pose) with neck stretches in a YogaDome, a geodesic dome in Patagonia. She is wearing peach colored tights and a light colored sports bra, and practices on a magenta colored mat. The room has wood floors and you can see crocheted covers on the triangular shaped windows. A view of the sky can be seen through the windows.

Vajrasana (Thunderbolt Pose) with neck stretches

When hiking, we often stare downward at the trail, which increases strain on the muscles that hold our head upright. Moving your cervical spine gently in every direction, as well as offering some traction can help ease any ongoing neck pain. Kneel on the mat and sit back on your heels, with your shins on the ground and knees hip width apart. (Place a block under your hips if you feel discomfort in your hips, knees or ankles). Sit tall and offer yourself some neck stretches.

Woman with dark braid practices Marjaryasana/Bitilasana (Cat/Cow Pose) in a YogaDome, a geodesic dome in Patagonia. She is wearing peach colored tights and a light colored sports bra, and practices on a magenta colored mat. The room has wood floors and you can see crocheted covers on the triangular shaped windows. A view of the sky can be seen through the windows.

Marjaryasana/Bitilasana (Cat/Cow Pose)

Cat/Cow is one of my favorite poses to help you get back in touch with the integrity of your spine and to thoughtfully reconnect with your breath. The protraction and retraction of the shoulder blades can also ease soreness from wearing a backpack.The rhythmic motion of this pose helps to gently loosen tight muscles along the entire spine and open space in the back of your shoulders.

Woman with dark braid practices Anjaneyasana (Low Lunge) in a YogaDome, a geodesic dome in Patagonia. She is wearing peach colored tights and a light colored sports bra, and practices on a magenta colored mat. The room has wood floors and you can see crocheted covers on the triangular shaped windows. A view of the sky can be seen through the windows.

Anjaneyasana (Low Lunge)

The hip flexors work hard while you’re hiking, helping you lift your leg with each step forward. Tight hip flexors can decrease your stride length and cause your gluteus muscles to overwork, so you want to keep them as flexible and fluid as possible. Anjaneyasana is a great pose to relieve tightness and bring balance in the front and back of your hips. To add some chest opening, raise a climbing pole above your head and reach your arms back slightly behind your ears.

Woman with dark braid practices Anjaneyasana (Low Lunge) with quadricep stretch in a YogaDome, a geodesic dome in Patagonia. She is wearing peach colored tights and a light colored sports bra, and practices on a magenta colored mat. The room has wood floors and you can see crocheted covers on the triangular shaped windows. A view of the sky can be seen through the windows.

Anjaneyasana (Low Lunge) with quadricep stretch

Anyone who has hiked a mountain knows how much of a toll that takes on the quadriceps. This version of Anjaneyasana is a staple stretch for all hikers, and yet one we often neglect. Bring your foot closer to your buttocks for a deeper stretch, or away from your buttocks for more focus on the hip flexor. Place a blanket under your knee for additional support. Reaching back to grasp your foot also provides an additional stretch for the chest and front shoulder.

Woman with dark braid practices Ardha Hanumanasana (Half Splits) in a YogaDome, a geodesic dome in Patagonia. She is wearing peach colored tights and a light colored sports bra, and practices on a magenta colored mat. The room has wood floors and you can see crocheted covers on the triangular shaped windows. A view of the sky can be seen through the windows.

Ardha Hanumanasana (Half Splits)

Your hamstrings work in conjunction with the quadriceps to bend your knees while you walk, and they’re especially important when you are climbing. Hamstring health is integral to hiking because they have to lengthen considerably when the knee extends and the hip flexes as the foot contacts the ground. If you have tight hamstrings, your knee won’t extend properly which will impact your gait, often causing knee, hip or back pain. Practicing half splits is a great way to access hamstring opening, while also controlling how deeply you stretch. Place blocks under your hands if you prefer more back and gluteal lengthening. For an additional stretch for your shin muscles, press the sole of your front foot toward the ground.

Woman with dark braid practices Virabhadrasana I (Warrior I Pose) with hands in reverse prayer in a YogaDome, a geodesic dome in Patagonia. She is wearing peach colored tights and a light colored sports bra, and practices on a magenta colored mat. The room has wood floors and you can see crocheted covers on the triangular shaped windows. A view of the sky can be seen through the windows.

Virabhadrasana I (Warrior I Pose) with hands in reverse prayer

Warrior I is often thought of as a strengthening pose for the hips and legs, and it is. However, the positioning of the back leg also provides a stretch for the hip flexor, hamstring, and calf muscles. For a little less work in your front leg back out of the knee bend a bit. (It’s true, your front thigh doesn’t have to be parallel to the ground all the time, especially if your legs are tired from hiking!) A nice add-on to this pose is to bring your hands into reverse prayer or fist-to-fist. This gives a stretch to your shoulders and chest.

Woman with dark braid practices Eka Pada Raja Kapotasana (Pigeon Pose) in a YogaDome, a geodesic dome in Patagonia. She is wearing peach colored tights and a light colored sports bra, and practices on a magenta colored mat. The room has wood floors and you can see crocheted covers on the triangular shaped windows. A view of the sky can be seen through the windows.

Eka Pada Raja Kapotasana (Pigeon Pose)

Let’s talk buttock muscles: Our glutes do a lot of work for us day in and day out–and they are literally built to help get hikers uphill. When we factor in the force of gravity and a heavy backpack, this greatly increases the work on the gluteus muscles and quadriceps in comparison to walking on a flat surface. To counter that workload, Pigeon is a great posture to stretch your buttocks muscles. To provide an additional stretch of your quadriceps in your back leg, bend your knee and draw your heel toward your glutes.

Woman with dark braid practices Ardha Matsyendrasana (Lord of the Fishes) in a YogaDome, a geodesic dome in Patagonia. She is wearing peach colored tights and a light colored sports bra, and practices on a magenta colored mat. The room has wood floors and you can see crocheted covers on the triangular shaped windows. A view of the sky can be seen through the windows.

Ardha Matsyendrasana (Half Lord of the Fishes)

Hikers commonly have tight IT bands, and this rigidity can often manifest as lateral knee pain–pain on the outside of the knee. If the gluteus muscles are too tight, (see Pigeon above), this can cause the IT bands to become even tighter. Half Lord of the Fishes pose is a nice way to relieve tightness in the IT band, while also providing a chest opening spinal twist.

Woman with dark braid practices Vajrasana (Thunderbolt Pose) with Gomukhasana (Cow-Face) armsyoga in a YogaDome, a geodesic dome in Patagonia. She is wearing peach colored tights and a light colored sports bra, and practices on a magenta colored mat. The room has wood floors and you can see crocheted covers on the triangular shaped windows. A view of the sky can be seen through the windows.

Vajrasana (Thunderbolt Pose) with Gomukhasana (Cow-Face) arms

If you hike fast, your ankles may be in a perpetually dorsi-flexed position. This can cause tightness in your tibialis anterior (your shin muscles), which can also cause ankle instability. Stretching the fronts of the lower legs will not only help you stay on the trails with a healthier stride, but it also feels so good. If this pose feels too intense in your knees or ankles (see neck stretches above), sit on a block for support. Also, a nice add-on, which stretches your triceps and forearms, is to bring your arms into Gomukhasana, using your hiking poles instead of a strap to help your hands reach each other.

fWoman with dark braid practices yogiv breathing exercises in a YogaDome, a geodesic dome in Patagonia. She is wearing peach colored tights and a light colored sports bra, and practices on a magenta colored mat. The room has wood floors and you can see crocheted covers on the triangular shaped windows. A view of the sky can be seen through the windows.

Breathing exercises

When we hike, we are often so busy taking in the scenery or watching our step that we often forget to breathe in the beautiful forest or mountain air. Take a moment to practice some breathwork to remind yourself to stay fully open, present, and awake to all you’ve accomplished, and all that is to come.